Introduction
This is a guide intended for Bazaar Creators. If you are a Forge user and do not plan on selling your compendium module, we have an easier method to creating compendium modules here.)
In this guide, we explain step-by-step how to create a compendium module to sell and distribute.
This post is part of a series of posts dedicated to explaining the Bazaar Creator process. If you are uncertain about anything else related to The Bazaar, The Forge has a series of guides meant to teach new Bazaar Creators how to get started:
- Getting Started as a Bazaar Creator
- Introduction to Bazaar Packages
- Creating a Compendium Module ← You are here.
- Creating an Assets Package
- How to submit a package to The Bazaar
- How to share revenue with other Bazaar Creators
- Bazaar Creator FAQ
This guide assumes you have a basic understanding of Foundry Virtual Tabletop- to a level where you know how to create actors, scenes, and items within Foundry VTT. Foundry VTT offers a knowledge base here if you do not. We also suggest running games within the system you are creating content for- by doing this, you will gain more familiarity with what your customers/users will want!
This topic is complex, and there’s a lot of ways to bundled content. We only explain common methods of package creation for creators who are not technologically proficient, or knowledgeable in coding/Foundry VTT content creation.
Software module developers, as well as system developers should reach out to The Forge via email, as the process for distributing this content and configuring the Bazaar package listing is only slightly different than typical Foundry VTT distribution.
What is a compendium module?
Compendium modules are modules that help distribute content for Foundry VTT. Compendiums are basically folders for content within Foundry VTT. They help organize content, allow users to store content for later outside of the game world, and serve as a useful method for using content between worlds, or distributing content to other users.
Many forms of content can be stored in compendiums. Map compendium modules, or “map packs” are the most common premium content on The Forge. These map packs contain not only the map images, but all of the dynamic lighting and walls necessary to take full advantage of the strengths of Foundry VTT. They contain the scenes that your games can run in.
The same can be done for any kind of “entity” in Foundry Virtual Tabletop- Actors (commonly known as character sheets, or PCs/NPCs), Items, Journal Entries, Macros, Playlists, Rollable Tables, and as mentioned before, Scenes.
A single compendium can contain one of these entities, and can reasonably contain hundreds of entities without significant issue. A module can be used to distribute several compendiums at once, allowing creators to distribute any amount of different compendiums and their “entities”. This can include a mix of content, including a scene compendium, an item compendium, and an actor compendium!
Does this sound confusing? To make this simple, imagine Foundry VTT is a computer, and compendiums are its file system. The computer (Foundry) will receive this module, and once installed read some prepared instructions within it, telling it that these are folders it can access.
We promise, setting up a compendium module is easier than it sounds!
Making a compendium module
Making a compendium module is very easy. Foundry VTT has a built-in compendium module generator, which we provide a basic run-through of below.
There are also a few online tools that can generate a compendium module. While we cannot recommend any online tool in particular, we have found that this module generator is very easy to work with for creators unfamiliar with the module.json format: Sneat’s Scene Packer Module Generator. It has the side benefit of working with the Scene Packer module, a tool that allows users to automatically import the entire module into a game- very useful if you are distributing an entire adventure that you want users to be able to install in pre-existing worlds!
We explain how to use both below.
Foundry VTT’s Module Generator
For most creators, we would recommend using Foundry VTT’s built-in compendium module creator. You can access this generator on your own installation of Foundry VTT (We do not recommend building a compendium module within The Forge).
You can access the module creation menu by opening Foundry VTT, and navigating into the setup menu. From there, navigate to the Add-On Modules tab at the top.

From there, select the `Create Module" button, which is outlined in red below:
![]()
The menu within Foundry VTT will guide you through the process of setting up the module. Make sure to check through each tab when creating your module, to make sure everything has been added.
Once you are done editing the module, scroll to the bottom of the menu, and select Create Module. Your module will be created, and you can now begin editing it. We explain how to do so in the “Adding Content” section below.
Sneat’s Scene Packer Module Generator
Note: We do not recommend use of scene packer for compendiums not meant to be imported all at once into a world, such as map packs or playlist packs.
To get started, simply fill out the form on the website with the needed compendiums, their names, and other relevant information about the module. Once it’s completed, you can download the pre-assembled module.
From there, you’ll need to bring the zip file download into your modules folder in Foundry VTT, and unzip it there.
You can quickly access your modules folder on Windows by opening Foundry VTT, and right clicking on the icon in your task bar. From there, just select “Browse User Data”. Navigate into the data folder, and then into the modules folder. Unzip the zipped compendium there.

If you are using Scene Packer, you will also need to install the Scene Packer module before proceeding. You can do so through the module installation menu in Foundry VTT.
Adding content to a compendium module
Now you can begin adding content to the compendium module.
We recommend creating a new world in Foundry VTT. Make sure that your world is the same system as your compendium module, if you have a system-dependent compendium.
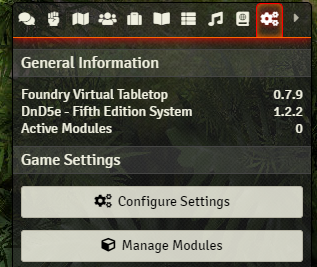
Once you have created a new world, launch it. Navigate to the Game Settings tab, and select “Manage Modules”.
Scroll through the menu as needed, until you find your compendium module. Select and enable the module.
Once enabled, you’ll receive a prompt about importing data from the compendium module if you chose to use Scene Packer. Just close this- your users will receive the same notification when they install your compendium module, but they will receive the content you add.
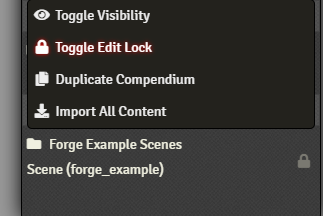
Navigate to the compendiums tab in your world. From here, you’ll want to right click and select “Toggle Edit Lock” for each compendium from your module. This will allow you to import content into the compendiums. Non-world compendiums have editing locked by default, to ensure users will not have their content overwritten by module or system updates- however, in this case you are the “developer” providing the updates.
Once all of this is done, you can begin creating your content, and adding them into the compendiums! Please keep in mind that when you add media to be used for the compendium module, it should be placed inside the compendium module folder- this way when you distribute the compendium module, users will also get the media you are distributing.
Once every entity has been created and added to the compendiums, you’re ready to begin preparing the module for distribution!
Distributing Your Compendium Module
To set up distribution, you will need a host or cloud provider that will allow downloads of your module, and your manifest file (this will be explained later).
In this guide, we will use Dropbox as an example. There are some drawbacks to Dropbox. It has a 20GB bandwidth limit, and 100,000 download limit per day for free accounts, and a 200 GB bandwidth limit for paid accounts. But despite these drawbacks, Dropbox is a relatively easier platform to use for new creators.
Other cloud platforms and hosting services will generally work as well, though they will need to support sharing file downloads, in the form of including a file extension at the end of the download URL (Google Drive does not do this by default, and requires some manual work to produce the URL). Generally, the more a service supports a stable URL, the better the experience for you and your users.
Create a folder for your module, in your cloud file hosting service of choice. From here, zip up your module folder (do not delete it from your local Foundry- you will still need it). WinRAR and 7zip will both work equally well, but it must be contained within a .zip file. Upload the zip file to the cloud service, within the module folder you created there.
Now, obtain the file link to the zip folder. With Dropbox on Desktop, you can right-click the zip file within Dropbox, select “Share”, and then obtain a shareable link in the bottom right corner of the menu. If you are using Dropbox, edit the “dl=0” at the end of the link to instead say “dl=1”- this is necessary for it to work from Dropbox.
(Note: Once you have selected “Share” in Dropbox, avoid deleting linked files- only overwrite them, as deleting them will update the shared link.)
Go back to the module.json in the original folder location, and edit the download field. Fill in the download field of your zip file using the Dropbox link. Save these changes. You now have a working download link for your module!
There is one more thing to do- creating a manifest file. You already have everything you need to send the module to others- but for users to easily install a module, they will need a manifest. You will also need a manifest URL if you wish to distribute/sell your package to others through The Bazaar.
Thankfully, this is simple to do- your module.json will be your manifest!
- Copy your module.json to the module folder in your cloud service.
- From there, obtain the link to the module.json, following the same process that you did for your zip file.
- Now, edit the “manifest” field in the module.json outside of the zip file. Fill in the
manifestfield with the link to your module.json in the cloud module folder. - Copy the module.json from your cloud folder, and replace the one located in your local modules folder (this will helpfully update your module.json for the future).
With this, you only have one more thing to do- overwrite the zip file in your cloud folder with a newly zipped version of your module. This is because your zipped module still contains the old data from your module, which is missing the download link and manifest URL. Without these, your module will not update correctly. Once this is done, you should be complete, and your module is now ready to be distributed!
