Introduction
In this guide, we explain how to create a asset package for The Bazaar, completely from scratch.
This post is part of a series of posts dedicated to explaining the Bazaar Creator process. If you are uncertain about anything else related to The Bazaar, The Forge has a series of guides meant to teach new Bazaar Creators how to get started:
- Getting Started as a Bazaar Creator
- Introduction to Bazaar Packages
- Creating a Compendium Module
- Creating an Assets Package ← You are here.
- How to submit a package to The Bazaar
- How to share revenue with other Bazaar Creators
- Bazaar Creator FAQ
This guide assumes you have a basic level of understanding with Foundry Virtual Tabletop- to a level where you understand what media (images, audio, video files) are compatible with Foundry Virtual Tabletop. Foundry Virtual Tabletop has a guide to compatible media here: Media Optimization Guide | Foundry Virtual Tabletop
What is an Asset Package?
Asset packages are bundles of Foundry-compatible media packaged together for users who purchase this content. Asset packages do not come with associated Foundry VTT data- for example, maps in an asset package will not be associated with a pre-made scene, token images will not come associated with a pre-made actor, etc.
That is not to detract from their usefulness- asset packages are far more convenient than uploading the same files to The Bazaar manually! Furthermore, users who obtain or purchase asset packages will have them hosted for free on The Bazaar. Asset packages are also very useful for distributing tile images- tile images do not currently exist as entities within Foundry, in the way that scenes or actors do.
Asset packages are the fastest, and most convenient option for distributing Foundry-compatible media. However, there is still some work associated with distributing them on The Bazaar- which we explain below!
Creating an Asset Package
*Note: In creating this asset package, Dropbox is used as an example cloud hosting service for the asset package. You can use any cloud hosting service that supports linking directly to the asset.json file. You can also use The Forge, via uploading to your account’s asset library.
To begin, you will need to create a “master” folder for the asset package, and then a folder within this “master” folder to hold your assets. You can name the master folder whatever you wish, but it is strongly recommended that the asset folder, and all related folders and media files within avoid containing spaces, capital letters, or special characters (non-letters or numbers). Various software bugs can occur for files that violating this naming practice.
Beyond this recommendation, you can sort your asset files into the asset folder however you want, create any amount of sub-folders you wish to organize these assets, etc. Bear in mind that users will need to navigate through these folders in order to find your assets. Striking a balance between organization and accessibility should be kept in mind for any creator setting up an asset package.
Finally, make sure to be careful placing files within the asset package folder. Once content on the internet is distributed, it is potentially available forever, even if taken down later. Be careful not to distribute sensitive documents or media in your asset package!
As an example, I have created an asset package folder below.

Once you are done adding content to your asset package folder, there is only one thing left to do before creating the asset manifest file- zip it! Make a zip file out of the entire asset folder. You can use 7zip or WinRar to this purpose, but it must be a .zip file. It is recommended that you do not use capital letters, spaces, or special characters in the naming of the .zip file.
Editing an asset.json file
Note: The Forge uses the Package Manifest+ format developed by the League of Developers. This means that The Forge can parse more data within an asset.json, and display useful information (such as creator websites or social media) automatically!
A “JSON”, or JavaScript Object Notation file is far less scary in complexity than the name sounds. To simplify things, it’s just a fancy text file- and in this situation, the asset.json is the file that tells The Forge “this is an asset package, and here are the details about it, including the download location”.
You can technically use most text editing programs to make and edit a .json file- but we recommend using Notepad++ for editing- it is a common program for this kind of usage, and the one that will be used in this tutorial.
Once you have chosen your text editor of choice, you can download an example asset.json to edit here. Place the asset.json in your containing folder, and then we can begin editing it.

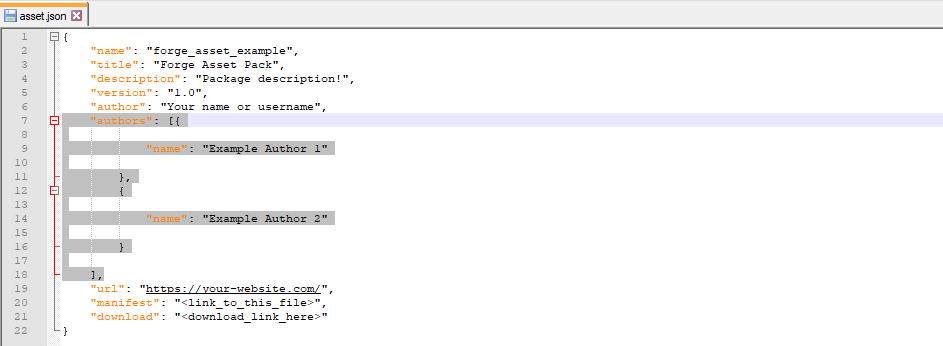
Again, editing the asset.json (pictured below) may look scary- but a lot of the work has already been done, and there are only a few parts that need edited for your own personal usage. This guide will go step-by-step to explain it.

Under the name field, you will see in quotation marks “package-name”. Without deleting the quotation marks, edit the name inside to match the name of your zip folder. This will not be the name that appears for your user. In this example, we named our zip folder folder “forge_asset_example”, and so we’ll replace “package-name” with “forge_asset_example”.
Under the title field, you will see in quotation marks “Package Title”. This is where you can put the actual title of your module, for users to read when they’re viewing the module in the Bazaar, or in-game under the Foundry file browser. This can have as many spaces and symbols as you want. In this example, we’ll replace “Package Title” with “Forge Asset Pack”.
Under the description field, you will see in quotation marks “Package description!”. This is the description that users will see when previewing your product on The Bazaar. We recommend making this product description short, but enticing for customers. The screenshot below depicts how much text a user will see before it is cut off- make these opening words count!

The version field does not need to be changed- this is merely the version number of your asset package. Updating and managing an uploaded package will be discussed in a future forum guide.
There is both an author field and an authors field in this asset.json. Foundry VTT does not recognize the authors field, but The Forge does- as many packages submitted to The Forge have multiple creators. If there is only one author associated with the package, you can delete the entire authors section, as is highlighted below (You should not, however, delete the author field. ):
If only one author/creator is involved:
Under the author field, edit the text that says “If one author, include here”, and state the title/nicknames associated with the creators here, or the name of the associated business (whichever you prefer).
If more than one author/creator is involved:
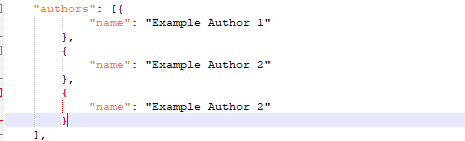
You can edit under the authors field “Example Author 1”, and “Example Author 2”, replacing it with your text of choice. If there are more than two creators/authors associated with the product, add a comma to the end of the second name field, and copy the name field below, like so:
In this example, we will be deleting the authors field, as there is only one creator/company associated with the package- “The Forge VTT”. We will instead fill that in appropriately, in the author field.
The url field is recognized by The Forge, and used to point toward the package’s associated website. You can use this field to point to your package’s Git page, if you use one- or you can use it to point to a Patreon website, or social media, or any other website associated with the package in question. For this example, we will edit “https://your-website.com” to instead say “ forge-vtt.com/ ”.
The manifest field is the URL location of your asset.json (the file you are editing). This is why in my example, I have been editing the content within Dropbox. With a right click on the file in the File Explorer, you can select the “Share” button. From here, I can create a link in the menu options. You will need to replace the “dl=0” at the end with “dl=1” From here, I edit “<link_to_this_file>” to include the actual link, including the edit I made to the end. This process will vary across cloud-hosting platforms- but as long as the cloud host supports obtaining a link directly to the file, it will work for your asset.json.
Finally, the download field is the URL location of your asset package’s zip file. Again, if you are using Dropbox, obtaining a shareable URL is easier. With a right click on the file in the File Explorer, you can select the “Share” button. From here, I can create a link in the menu options. You will need to replace the “dl=0” at the end with “dl=1” From here, I edit “<link_to_this_file>” to include the actual link, including the edit I made to the end. This process will vary across cloud-hosting platforms- but as long as the cloud host supports obtaining a link directly to the file, it will work for your asset.json.
And with this, you are done! Your asset.json and folder should look something like the following:

Unfortunately, there isn’t a convenient method of testing if your asset package is created correctly or not. Natively, Foundry does not support asset packages, and The Forge is currently the only platform that supports them.
However, you can make sure that the asset.json is valid by copying the contents of the asset.json file, and pasting it into a JSON validator, such as JSONLint. Note that this will only tell you if the asset.json file is formatted correctly- it can still have mistakes that prevent it from working properly within The Forge.
If you formatted everything correctly, JSONLint, or your JSON validator of choice should say something like the following:

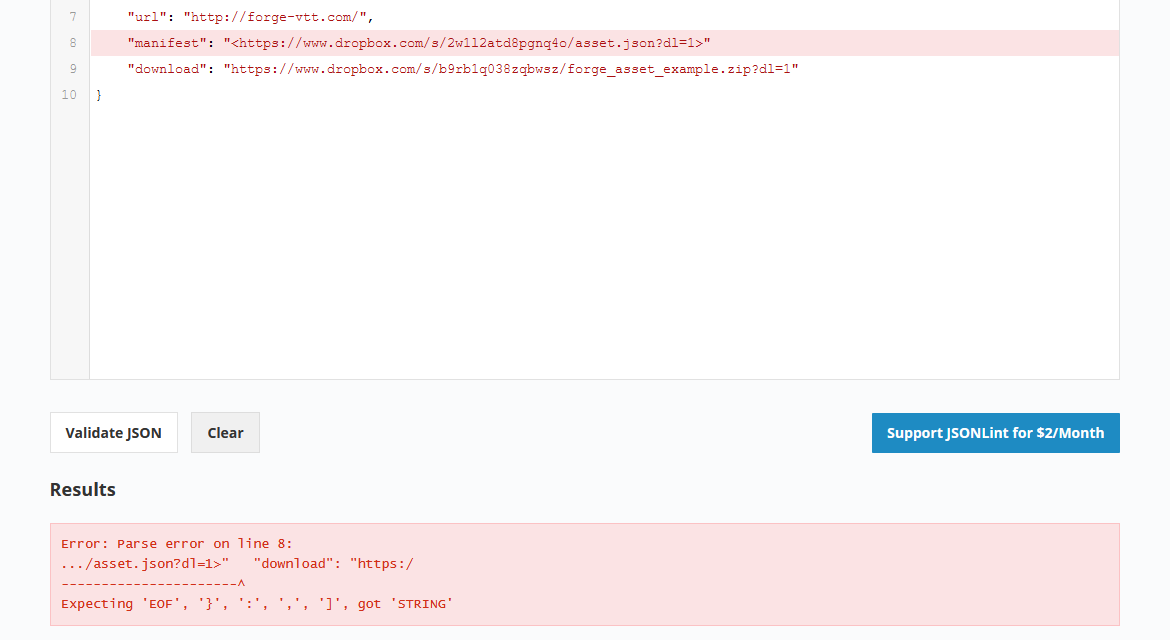
If you did not format correctly, such as accidentally misplacing a comma, the validator will generally inform you of the mistake, like so:
After doing this, your package should be ready for submission to The Bazaar! If you wish to further verify that your asset package has been prepared correctly, you can send the asset.json in for review to Forge staff, by requesting it in the Bazaar Creator Discord channel.
Once you are comfortable proceeding, your package can be submitted for review, and approval to The Bazaar! We will be creating a guide at a later date, explaining how to submit/update content on The Bazaar marketplace.